A Curve in the Corner: A 1/72 Roman Circus for the Colchester Windowsill
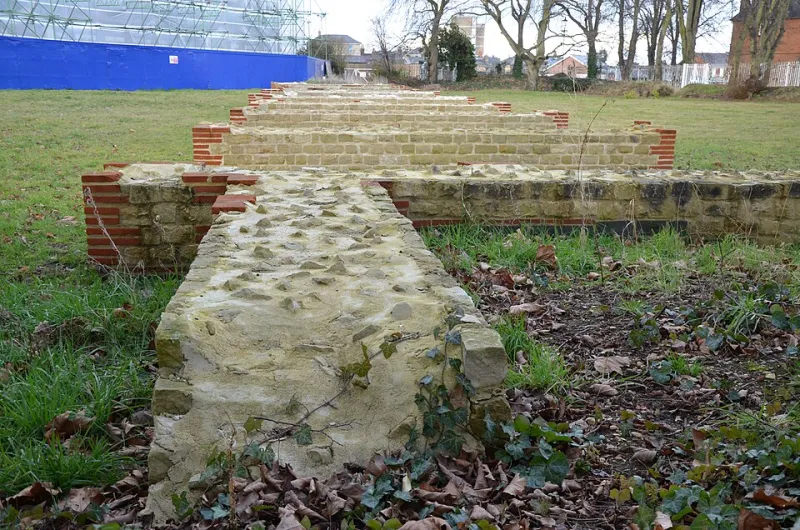
Photo: Carole Raddato from Frankfurt, Germany, CC BY-SA 2.0, via Wikimedia Commons
The first problem with Colchester’s Roman circus is scale. The second is that everyone tries to build the whole thing. At 1/72, the full circuit would run over six metres — longer than most Essex spare rooms and definitely longer than a windowsill. So this is not a model of the circus. It is a quarter-circle vignette: a slice of curved seating, a strip of track, one chariot team, and enough damaged masonry to suggest the rest. It fits a 60cm windowsill, a club-night carry box, and the A1 Models house rule that a project should be finishable before the next kit lands.
Start with the footprint, not the history
Before card gets cut, spend an evening with the Colchester Roman Circus Centre’s site notes and the excavation summaries. The key facts are simple: Britain’s only known Roman circus, discovered under the Garrison in the early 2000s, with starting gates that survive as foundations and a curved end that has long since gone under later Colchester. You do not need to memorise seating capacities. You need two measurements: the curve, and the width of the track. Everything else is scenery.
At 1/72, the real circus is roughly 6.2m long if you model every metre. A windowsill vignette can show about 70cm of the curved end at a push. That means compression. Treat the seating as a bank rather than a stadium, and let the track disappear into a painted backdrop or a low broken wall. If anyone asks why it is not full length, tell them it is a detail model, not a survey.
Faking the cavea with household card
The curved seating is the bit that sells it. Do not carve foam for a fortnight. Make a rib template first: draw a semicircle on a cereal box with a pencil and a piece of string, then cut five ribs from 5mm foam board. Space them along the base, glue with PVA and pins, and skin the outside with thin card from a multipack box. The inside becomes a series of stepped shelves cut from mount board offcuts. A 2mm step at 1/72 is about 14cm in real life — close enough for a seating tier when the viewer is a metre away.
Texture: coat the card with ready-mixed filler, stipple with a stiff brush, and press in a few stone shapes cut from cork. When dry, seal with diluted PVA. Paint with a base of earthy grey-brown, then drybrush pale stone and add a thin wash of burnt umber. Colchester brick and tile can be suggested with a few tiny rectangles of orange-red card pushed into the filler before it sets. Keep it restrained. The circus was a big timber-and-stone structure, not a cartoon colosseum.
Chariots: source, convert, or cheat
1/72 chariot figures are not exactly on every high-street shelf. You have three routes. First, buy a small 20mm ancients pack and accept a little scale creep; at the back of a windowsill vignette, a millimetre or two will not hang anyone. Second, convert. A pair of 1/72 cavalry horses can be re-harnessed with stretched sprue and fine wire; a standing Roman torso becomes a charioteer with a plastic-card apron and a bent-pin whip. Third, cheat with a single ready-made chariot and hide the weak bits behind dust and a figure.
Make the chariot body from 1mm plastic card: a shallow D-shape, a curved front, two axle mounts. Wheels can be sliced from plastic tube or built from beads and card. Paint the team as a matched pair — chestnut, bay or grey — because at this scale the eye reads colour grouping faster than it reads anatomy. Base the horses on a thin strip of plastic so the team stays aligned. Add reins from very fine wire or stretched sprue, but do not overdo them. If the reins look like rigging, you have gone too far.
Deciding how much ruin to show
This is the editorial decision that makes or breaks the piece. A full reconstruction looks like a theme park. A pile of rubble looks like a broken model. Aim for the middle: one side of the curve still shows four or five seating steps; the other side is cut away to foundation trenches. Add a robbed-out wall line, a few tumbled blocks, and a patch of sandy track. Leave the rest to the viewer.
Colchester’s remains are largely foundations and negative evidence, so a cut-away is honest. It also solves the windowsill problem: you can show the structure in section without pretending you have modelled the whole cavea. Keep any labels tiny and on the base edge, not stuck to the model. A diorama should invite a question, not deliver a lecture. If you want to explain the circus, put a one-page card beside it at club night and let people read.
Windowsill-proofing
A windowsill is a hostile place: sunlight, condensation, radiators, cats. Seal the base with acrylic varnish, avoid paper for anything structural, and use brass wire rather than steel for any pins. A north-facing window is kinder. If the sill gets direct sun, a simple clear acrylic cover — or an upturned clear plastic food container — will keep dust off and stop small figures going walkabout. Fix the base with museum putty rather than screws; rented sills and family peace are both worth preserving.
The club-night test
Take it to Colchester A1 Models before you call it finished. The club-night test is simple: put it on a table at eye level and see what people ask. If they ask about the chariot, the curve works. If they ask what it is, the base needs a clearer silhouette. If they ask where the rest of it is, you have done your job — that is the point of a vignette.
Finish with a name plate, a thin edge of dark paint on the base, and a final dust with a soft brush. The whole build should cost less than a decent 1/48 kit and take about three weekends, assuming you stop researching and start cutting. The circus was never going to fit on a windowsill. A curve of it will.